Seaming Your Knitting
Several methods and alternatives to to seam your knitting
5/12/20255 min read
Seaming knitwear seems to be one of those things that you either love or hate. Most knitters hate it (myself included), but it is necessary sometimes. Generally, you will want to block the pieces before you start seaming. For instructions on how to block, check out my blog post here. I will go over a few different ways of seaming knitted pieces together and when to use them. Try them all and see which method you like the best. Typically, you will use the same yarn used in your project, but I will use a different color for demonstration.
Mattress Stitch
The mattress stitch seam is invisible, however, you will want to add selvedge stitches to the edges of your knitting. This method works well for side seams when the stitch pattern is the same on both pieces. First, place your knitted pieces with the right sides facing up, with the sides you will seam placed next to each other. Using the same yarn you used in the project, use a tapestry needle to weave behind the bar in between the first and second columns of stitches. Then, weave it in the same place on the opposite piece. Continue up the columns back and forth between the pieces, pulling the yarn snugly every few stitches. You don’t want to pull it so tight that the fabric puckers, but enough for the edges to be pulled together.
Backstitch
The backstitch seam is a little more visible, but it is also more durable than mattress stitch. For this method, you will thread your tapestry needle with the same yarn used for your project. Insert the needle from back to front at the edge of one piece, then from back to front on the opposite edge of the other piece. Continue weaving back and forth, always inserting the needle from back to front. Again, you don’t want to pull your thread too tightly, as the fabric can pucker.
Whip Stitch
Whip stitch is easy to do and is very sturdy, but it can be difficult to make even and can look a bit unprofessional. To do this stitch, hold the pieces to be sewn together with the wrong sides facing out. Simply thread a tapestry needle with the yarn used for the project and insert it through both pieces at once. Continue along the edge, always inserting the needle in the same direction.
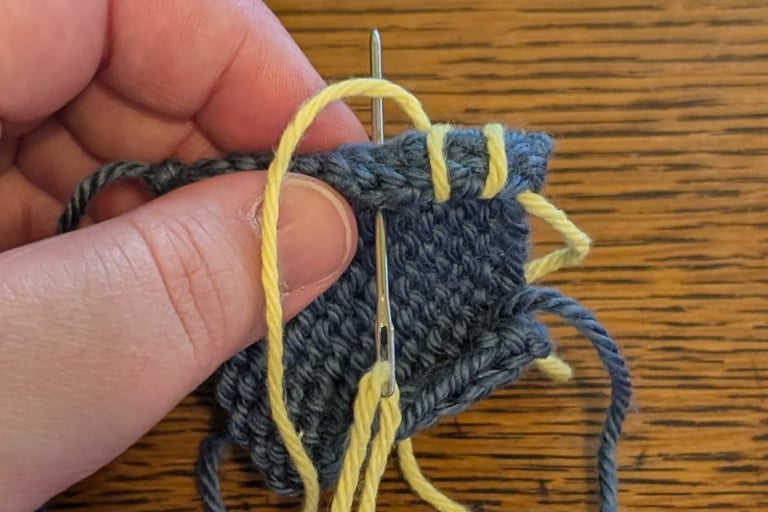
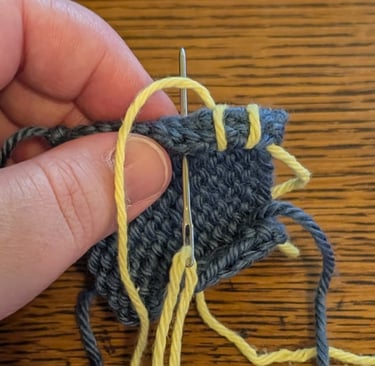
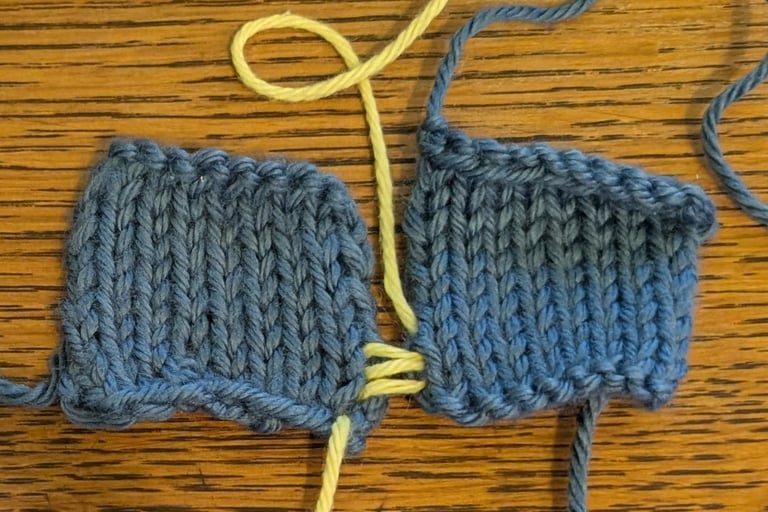
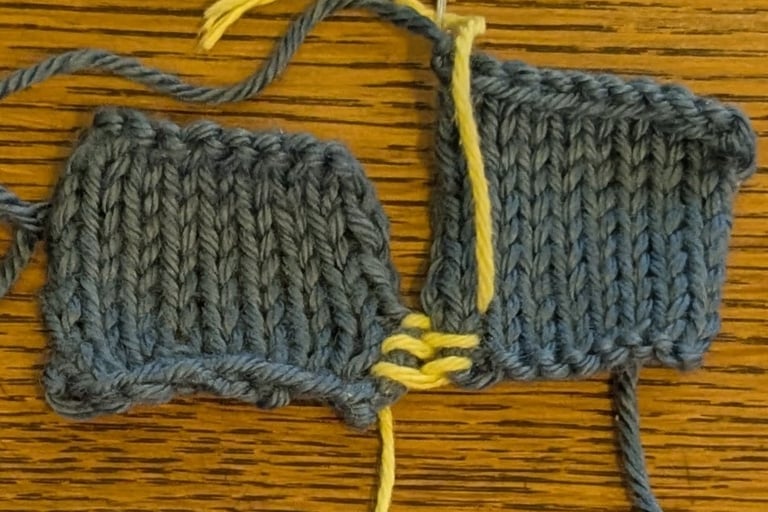
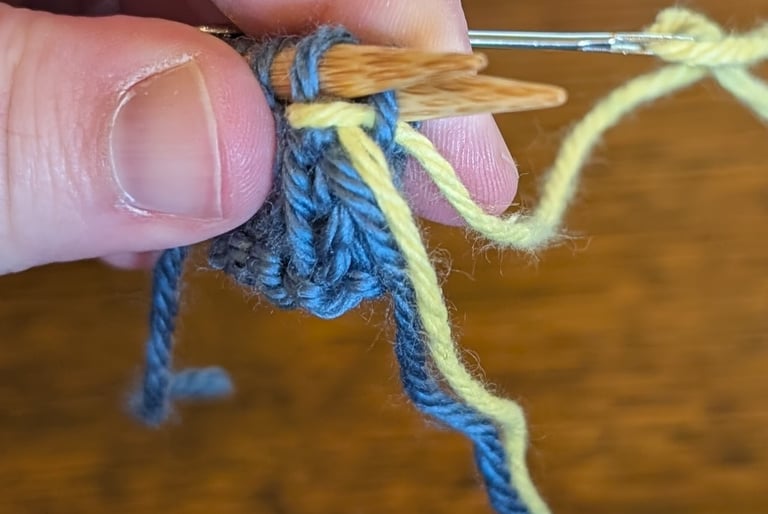
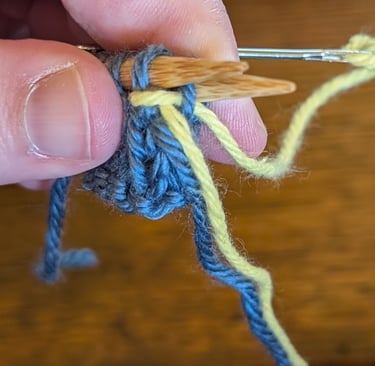
Kitchener Stitch/Grafting
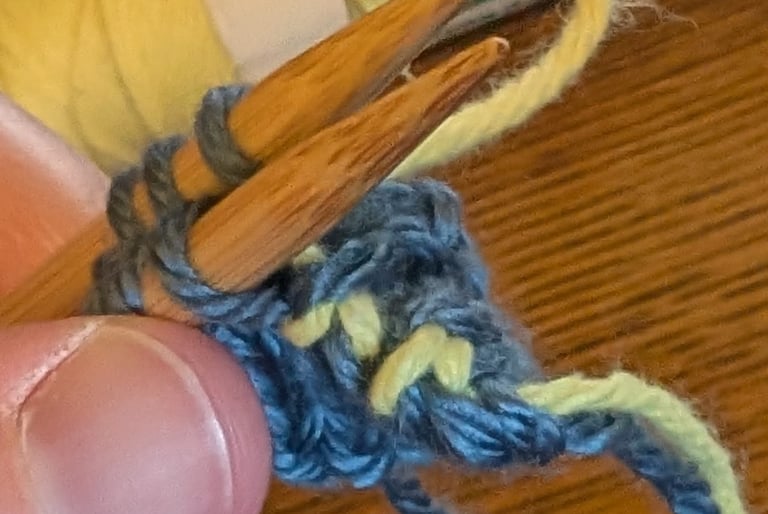
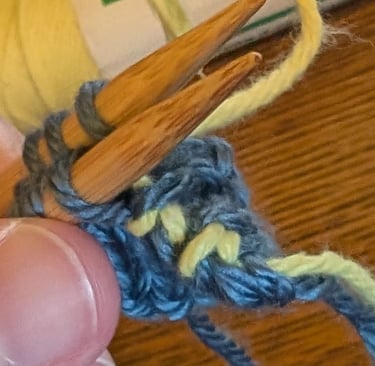
Kitchener stitch is an excellent choice when you have two edges that have not been bound off yet. It is commonly used for seaming the toes of socks. To do this stitch, you will need an equal number of stitches on two needles. Hold the two pieces together with the right sides facing out. Thread a tapestry needle with a long tail of the yarn you used in the project (usually connected to the first stitch on the back needle). To first set up kitchener stitch, insert the needle into the first stitch on the front needle purlwise and pull it through. Then insert the needle into the first stitch on the back needle knitwise and pull it through. The following 4 steps will be repeated until all the stitches have been grafted:
1. Insert the tapestry needle through the first stitch on the front needle knitwise, pulling the stitch off the needle.
2. Pull the tapestry needle through the next stitch on the front needle purlwise, leaving the stitch on the needle.
3. Insert the tapestry needle through the first stitch on the back needle purlwise, pulling the stitch off the needle.
4. Pull the tapestry needle through the next stitch on the back needle knitwise, leaving the stitch on the needle.
Whenever I do kitchener stitch, I literally say out loud, “Knit off, purl on, purl off, knit on” to help me keep track of what I’m doing. The first picture shows what kitchener stitch looks like after the setup, and the second shows the first couple of stitches grafted off of each needle.
Finishing
With all of these methods, you will finish by pulling the tail through the last stitch, creating a small knot, and then weaving in the ends like normal. Depending on the use of what you’ve made, you may want to block it again after seaming.
Alternatives
Circular knitting doesn’t eliminate all seams, depending on the project, however, many projects can be knit seamlessly in the round. Sometimes, knitting without seams can introduce some more advanced shaping techniques, so proceed with caution if you’re a beginner.
A three-needle bind-off can be used instead of seaming or grafting. In my opinion, this technique feels very awkward in my hands, and I, therefore, prefer kitchener stitch, but give it a try.
Picking up stitches works well for adding components like collars, pockets, and cuffs without the need to sew them on. Mastering the pickup and knit technique takes some practice, but it does open up some interesting possibilities in modular knitting.
If you have done some crochet, using crochet to join knitting may feel more natural to you. This join can be invisible or decorative, depending on the stitch you choose.
Making an I-cord to join edges gives an interesting raised texture to your seams. The nice thing about this technique is that you can do the I-cord edging as you knit, or make it separately later. Either way, a cordsmith tool like this makes this much faster, and I highly recommend getting one.
If you’ll be joining a cast-on edge to a bound-off edge, consider trying a provisional cast-on. You will cast on your stitches onto a piece of scrap yarn, and you can connect the edges once you finish, removing the scrap yarn. This works well for things like infinity scarves or cowls, as the seam imitates the look of the rest of the knitting.
If you have any questions or want help with any of these techniques, send me an email using the form below, and I will get back to you soon! Happy stitching!