How to Read Knitting Charts
How to read knitting charts for colorwork, lace, and cables
4/28/20254 min read
Knitting charts can be intimidating initially, but they are a wonderful tool. Not only are charts a more elegant way of delivering a pattern (in my humble opinion), but they also allow you to see the big picture and how each stitch fits into it. Seeing the big picture is really important in techniques like lace, cables, and colorwork, especially since you’re more likely to catch mistakes early. Charts also make complex stitch patterns much easier to follow, and don’t come with the same language barriers that written instructions have. I have met so many people who say they can’t read charts, but they are truly missing out on some great patterns by avoiding them.
How to Read a Chart
Charts will look a little different depending on the technique involved, but they are generally read the same way. Each square of the chart represents one stitch. If you’re knitting flat, right-side rows are read from right to left, and wrong-side rows (if included) are read from left to right. Some patterns will leave out the wrong side rows if they are all worked the same way (often times they are all purls). The pattern should tell you whether or not the wrong-side rows are included, and how to work them if they are not. If you are working in the round, you will read all “rows” of the chart from right to left. Typically, the rows and columns are numbered, making it easier to follow along.
Pattern Repeats
Stitch patterns that use charts are often repeated multiple times across one row or round. The number of stitches that get repeated is called the multiple. For flat projects, the chart will often have a red box around the stitches that get repeated, plus stitches on either side of the repeat. For example, if there are eight stitches that get repeated, plus two stitches on either side for a border, the multiple will be 8+4. This means that the number of stitches you will cast on will be a multiple of 8 plus 4. When working in the round, there will not be any border stitches, so the whole chart gets repeated. I find it very helpful to put stitch markers in between pattern repeats for easier tracking.
Tracking Progress
When working from a chart, it is important to keep track of where you are in the pattern. If you prefer printing out your patterns, consider using a highlighter to mark which rows you have finished. I have seen others use magnetic strips to cover their completed rows, which may be preferable if you need to frog at some point. Simple row counters work for this as well; analog counters are cheap and easy to use, or there are lots of row-counting apps for your phone if you prefer a digital version.
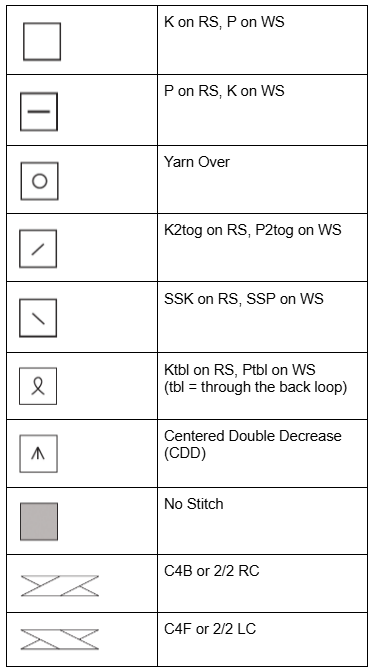
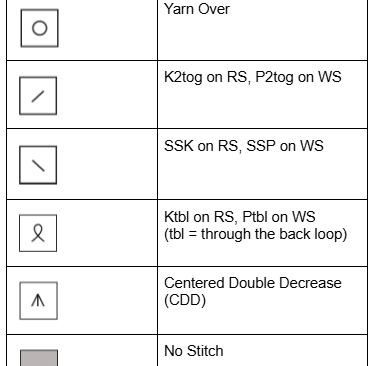
Chart Symbols and Legends
Whenever a pattern uses a chart, it should also include a legend. This will explain what each symbol means, as well as provide instructions for any uncommon stitches. Note that the same symbols can mean different things on the right side and the wrong side. This may seem confusing at first, but it does make it easier to picture what it will look like on the right side of the fabric. Here are a few of the most common symbols:
Colorwork
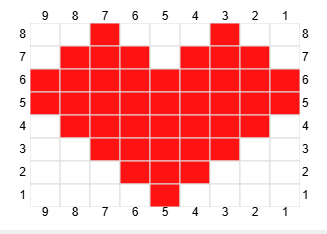
Colorwork charts are the easiest to read (in my opinion), especially if you’re only working with two colors. Typically, the squares are filled in with the colors that the designer used, or sometimes just black and white, representing the main color and contrasting colors. A trend I’ve noticed recently is that designers are sometimes including coloring pages for their colorwork patterns, so you can see what the colors will look like on the finished product. This can also help you follow along on the chart. Below is an example of a simple colorwork chart for a heart.

Lace
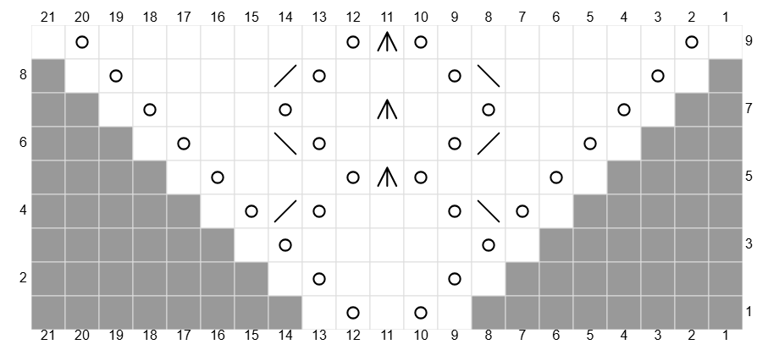
Lace knitting uses strategically placed yarn overs to create patterns of holes in the knitted fabric. Since yarn overs are increases, they are usually accompanied by decreases to keep the stitch count the same. Charts are essential to lace so that you can see how the pattern will look in the finished product. Written instructions for lace become very tedious and hard to follow, as the patterns are often very intricate. The gray “no stitch” square in the table above is most often used in lace patterns. It shows up when you increase or decrease the number of stitches in a row, meaning it’s just a placeholder for a stitch that doesn’t physically exist in that row. Below is an example of a simple lace knitting chart.
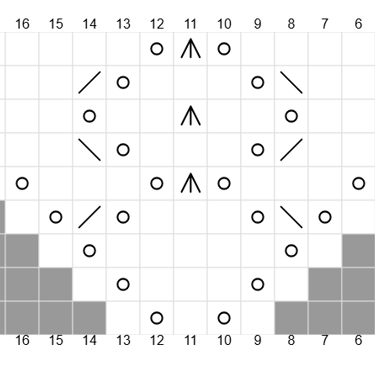
Cables
Cables add texture to knitted fabric by making some stitches swap places. For example, if you see in the written instructions to C4B, this means you’ll be doing a 4-stitch cable by putting two stitches on a cable needle, holding them in the back, knitting the next two stitches, then knitting the two off the cable needle. This might be written as 2/2 RC, meaning 2 stitches cross over 2 stitches leaning to the right; the action is the same. Similarly, if you hold the stitches on the cable needle in the front of the work, that will be written as C4F or 2/2 LC, as the cable leans to the left. These are just examples of 4-stitch cables, but they can have different numbers of stitches crossing over each other.
I hope this information has emboldened you to try knitting from a chart. If you have any questions about reading charts, send me an email using the form below. I have some colorwork courses in the works, stay tuned for those soon! Happy stitching!